

If you’ve ever wondered how to make foam for coffee with smart brew espresso machine, you’re in the right place. Because getting that silky, café‑level milk foam at home isn’t rocket science. It just takes understanding what the machine does, which milk to use, and how to steer the process so you end up with rich, velvety foam—not sloppy bubbles.
For readers who want to go beyond frothing and fully automate their morning coffee routine, check out our guide Turn Your Coffee Maker Smart for step-by-step tips on integrating smart plugs or automation.
Let’s roll up our sleeves and turn that smart brewer into a barista‑worthy tool.
- Why Milk Foam Isn't Just "Pretty" — It Changes Everything
- Microfoam vs. Cappuccino Foam vs. Cold Foam — Which One Are You After?
- The 90‑Second Foam Playbook: Get Good Foam Now
- Milk Matters: What to Use (and What to Avoid) for Best Foam
- The Full Low‑Tech Latte Routine
- When Foam Fails: What Often Goes Wrong (And How to Fix It)
- Maintenance & Cleaning
- Going Beyond Dairy: Tips for Non‑Dairy Milks & Cold Foam Lovers
- Pro Moves: Barista Tricks for Next-Level Foam (Without Leaving Home)
- Why Having a Smart Machine Doesn't Guarantee Good Foam — Technique Still Matters
- FAQs: How to Make Foam for Coffee With Smart Brew Espresso Machine
- Conclusion
Why Milk Foam Isn’t Just “Pretty” — It Changes Everything
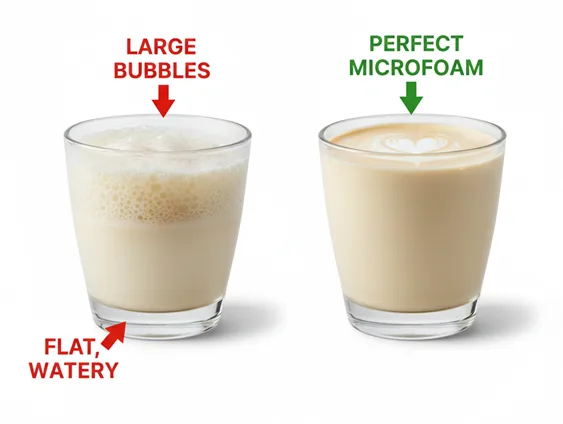
When you pour a latte, cappuccino, or flat white, the milk texture makes or breaks it. That creamy layer of foam isn’t fluff: it balances the espresso, softens acidity, adds sweetness, and gives the drink its body. Baristas call the ideal foam microfoam—velvety, smooth, with bubbles so small you can’t practically see them.
If your milk ends up airy and bubbly — or doesn’t foam at all — the drink will taste flat, watery, or uneven. So yes: nailing the foam is a game‑changer.
Funny thing is — once you know what to listen for and what to watch out for, you’ll rarely miss.
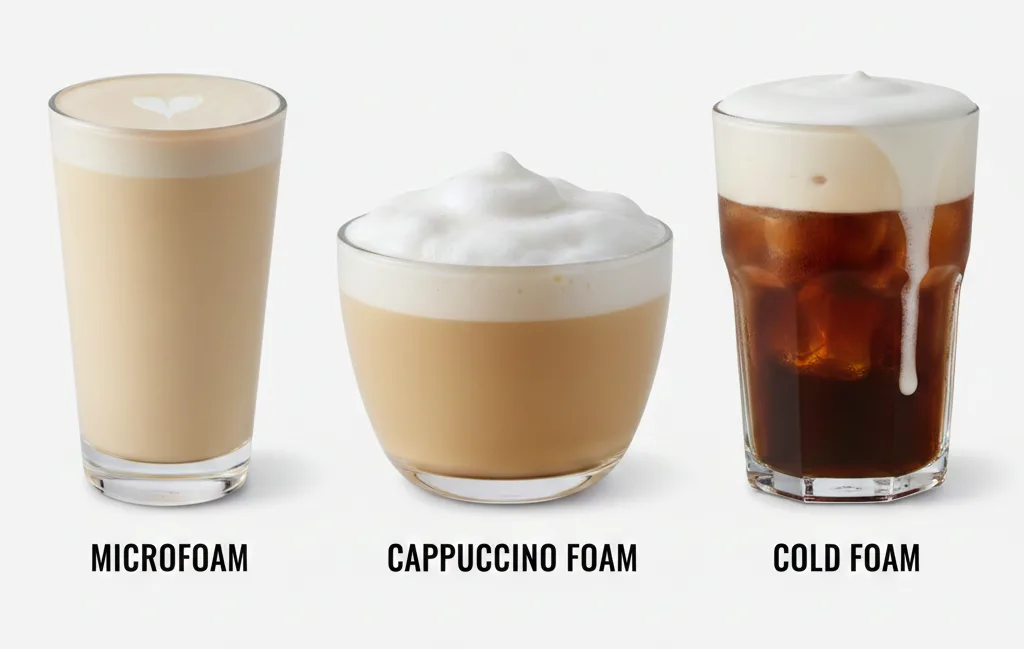
Microfoam vs. Cappuccino Foam vs. Cold Foam — Which One Are You After?
Not all foam is created equal. Smart brew machines (or automatic frothers) can produce different foam styles — and each suits a different vibe:
- Microfoam: dense, silky, ideal for lattes or pour-over art. Think “wet paint” consistency.
- Cappuccino foam (macrofoam / dry foam): lighter, airier, more volume — good if you like a thick foam cap or fluff.
- Cold foam: chilled, light foam for iced lattes or cold brews, useful when you don’t want to heat milk.
Your machine might label these differently (e.g., “latte/froth/cappuccino”), but knowing what you want helps you pick the right setting.
Choosing the right machine makes all the difference — take a look at our breakdown in Coffee Maker Features: What Actually Matters to see which frother or steam‑wand features are worth paying for.
The 90‑Second Foam Playbook: Get Good Foam Now
Want foam that rivals your favorite café — and fast? Try this quick method:
Begin with cold milk (straight from the fridge) and pour only half-full into your frothing pitcher or carafe. Milk expands when frothed, so avoid overfilling. Then, select the appropriate setting on your smart machine, which may be named “latte”, “froth”, or “cappuccino”.
If your machine uses a steam wand, set the tip just below the surface. You should hear a gentle hiss. That’s the magic air going into the milk. After 2–5 seconds, as the milk expands, slowly lower the pitcher so the wand gets deeper and creates a smooth whirlpool — this swirl breaks down bigger bubbles into creamy microfoam. Heat until the milk reaches about 140–150 °F (60–65 °C) — warm enough to bring out the sweetness, but not so hot that you burn the milk.
Then comes a small but critical move: tap and swirl the milk container before pouring. That knocks out large bubbles, polishes the foam, and gives you a smooth finish that blends beautifully with espresso.
If you’re using a machine with an automatic frother, pour cold milk, select the “milk‑froth” or “cappuccino” setting, and let it do the work. Once it stops, tap & swirl the jug — same as above. For iced drinks, run the frother with cold milk from the fridge for a few seconds, then pour it directly over your espresso or cold brew to create a light, airy cold foam.
Do this every morning — and you’ll get foam just right. No fuss.
Pro tip: If you’re trying to switch from big, airy foam to silky microfoam — think “less air, more swirl.”
Milk Matters: What to Use (and What to Avoid) for Best Foam
If you treat milk like an ingredient in a recipe, you’ll get concrete results. Here’s how different milks behave in a smart frother:
Whole milk is, without a doubt, the gold standard. It has enough fat and proteins to build stable, creamy foam and brings natural sweetness to your drink. 2% milk is a decent compromise — lighter but still capable of producing respectable microfoam.
Skim or non‑fat milk? Sure — it froths easily and gives plenty of bubbles. The problem: those bubbles are often thin and airy. Great for cappuccino‑style foam, not ideal for silky lattes or latte art.
Now, if you’re working with plant‑based or non‑dairy milks (oat, soy, almond, etc.), results will vary. Oat and soy, especially “barista blend” versions, tend to perform better thanks to added proteins and stabilizers. Almond or coconut milks can struggle — you might end up with foam that’s too airy or unstable.
If you’re new, start with whole or 2% dairy milk. Once you master consistency, then experiment with alternatives and see how your smart brewer handles them.
The Full Low‑Tech Latte Routine
Picture this: it’s early morning, you’re half asleep but craving that smooth latte. You walk to your smart espresso machine, half-awake, but determined. Here’s how you — or any smart home‑savvy DIYer — can nail café‑worthy foam in under three minutes.
First, grab cold milk and pour it into your metal frothing pitcher. Not more than half full. Slide the pitcher under the steam wand (or select the froth mode if you’re using an automatic frother). Turn it on.
You’ll hear a soft hiss — that’s air being drawn in. Keep the wand just below the surface for about three seconds. Then, gradually lower the pitcher to deepen the wand and create that gentle whirlpool. Milk will start spinning. After about 20–25 more seconds, reach for a thermometer (or use the palm‑test) and stop when the milk reaches about 145 °F. The pitcher will feel hot but not blistering.
Then hold the pitcher over your cup and give it a firm tap on the counter. That’s not clumsy — that’s the purpose. It bursts any stubborn big bubbles. Then swirl gently to blend foam and milk evenly into a glossy, creamy texture. Pour in your freshly pulled espresso. Watch the foam settle. Smell that sweetness.
Sip. Close your eyes. That’s your reward.
When Foam Fails: What Often Goes Wrong (And How to Fix It)
Even with a “smart” machine, foam can go sideways. But before you throw in the towel — let’s troubleshoot.
Sometimes your milk stays flat, like warmed milk with zero personality. Maybe the milk was too warm to begin with, or too old. Always start cold. Maybe your wand never introduced air. That soft hiss? If you don’t hear it, try repositioning the tip just at the surface.
Other times, you end up with giant, foamy bubbles that collapse the second you pour. That means too much air, too quickly — or you skipped the swirl. Correct with gentler air introduction and a deep swirling motion.
If your milk foam collapses right away, it’s likely because it got too hot. Maybe you overheated past 155‑160 °F — that denatures proteins, kills sweetness, and leaves the foam unstable. Also — if you haven’t cleaned your steam wand or frother in a while — old milk residue could be sabotaging foam formation.
Phrase it like this: foam is fragile. It’s part chemistry, part timing, part feel. Once you learn to read each variable, you’ll start getting victories, not disasters.
Pro tip: if your foam starts collapsing or smells “off,” run a quick maintenance check — our How to Descale Your Smart Coffee Machine guide walks you through cleaning and descaling step by step.
Maintenance & Cleaning
Here’s something every coffee‑obsessed smart‑home renter should know: your foam’s consistency often depends not on your milk, but on how clean your machine is. Residue from past milk steaming sessions can ruin texture, taste, and foam stability.
After every steaming or frothing session, quickly purge or rinse the steam wand. Wipe it clean. Once a week, do a deeper clean — soak parts if needed, descale if your water is hard, and clean out the frother. Treat the milk pathway with respect.
Your future self — sipping that perfect latte on a Sunday morning — will thank you.
Going Beyond Dairy: Tips for Non‑Dairy Milks & Cold Foam Lovers
If you’re vegan, lactose‑intolerant, or just curious, non‑dairy milks can still deliver decent foam. Oat milk and soy (especially barista‑blends) usually perform best, thanks to added stabilizers and protein content. Almond or coconut milks? They can work. But expect lighter foam, maybe more bubbly, maybe less stable.
For a chilled iced latte or cold brew: pour cold milk straight from the fridge into the frother and run the cold‑foam or “milk‑froth” setting. Pour immediately over your drink. Perfect for hot days or when you want a lighter texture.
Not as dense as a hot latte, but refreshing. And still feels like something cozy from a café.
Pro Moves: Barista Tricks for Next-Level Foam (Without Leaving Home)
After you get the basics down, try these:
Swirl & tap before pouring. That makes a huge difference. It polishes the foam, pops big air bubbles, and gives a smooth finish. Pour technique matters too. For latte art — slow start, then bring the spout closer to the cup, pour gently, wiggle slightly. Basic shapes like a heart or simple rosetta — not impossible at all.
Use a small frothing pitcher to help create a stronger whirlpool. Big pitchers for small drinks? That usually dilutes foam. Small pitchers = more control, better swirl.
If you want consistent foam but don’t have a steam wand, a quality electric frother works fine for cappuccinos and instant lattes. Just temper expectations: you might get airy foam rather than silky microfoam. But for a quick morning fix? Totally valid.
Why Having a Smart Machine Doesn’t Guarantee Good Foam — Technique Still Matters
Owning a fancy smart espresso machine doesn’t mean the foam’s automatically café‑worthy. Defaults and “one‑touch latte” settings get you 80% of the way. The last 20% — that velvety, pourable texture — is up to you.
You still need to treat milk like an ingredient, handle air and heat carefully, and clean like someone who cares about tomorrow’s foam. And if you’re picky about latte‑art or texture, don’t skip the swirl, tap, pour process.
That’s the “craft” behind the convenience.
FAQs: How to Make Foam for Coffee With Smart Brew Espresso Machine
Can I froth non-dairy milk (oat, soy, almond) with a smart espresso machine?
Yes — but results vary. Non‑dairy milks often have different protein and fat content, which affects foam stability. For best results, use a “barista‑blend” version (especially oat or soy). Accept that almond or coconut milk usually makes lighter, less stable foam.
What’s the ideal temperature for milk when frothing?
Aim for ~140–150 °F (60–65 °C). That’s warm enough to bring out milk’s sweetness, but not so hot that proteins denature — which ruins foam texture.
Why does my foam collapse immediately after pouring?
Common causes: milk overheating (above ~155–160 °F), poor steam/frother cleaning (residue impedes foam), or not enough swirling — all lead to unstable foam that deflates fast.
Can I make cold foam with a smart coffee maker?
Absolutely — many machines have a “cold-froth” or “foam” setting. Use chilled milk from the fridge, run the cycle, and pour over iced espresso or cold brew. Foam will be lighter, but ideal for iced drinks.
Is whole milk really better than skim or 2% for foam?
Generally, yes. Whole milk offers a creamy, stable microfoam thanks to its fat and protein content. 2% works decently. Skim milk froths easily — but produces thin, airy bubbles rather than that smooth, silky texture.
How can I get latte art with a smart machine?
After frothing, tap & swirl milk to polish it. Pour slowly: start from a little height, then bring the spout close and pour steadily. Once the foam is smooth and glossy, you can try basic patterns like hearts or rosettas.
Conclusion
Getting great foam isn’t about magic beans or overpriced gadgets. It’s about milk quality, technique, and consistency. Once you dial in cold milk, the right setting, proper frothing technique, and solid cleaning, you’ll get café‑style foam at home, no trade‑offs.
Try it tomorrow. Froth with care. Swirl, tap, pour. Taste the difference.
If you’ve been on the fence about a better automatic frother or smart espresso machine, it may be time to level up. With the right kit (and this guide in your back pocket), you’ll be sipping lattes with that dreamy microfoam finish — every. Single. Morning.
Go ahead. Make that foam. Your coffee deserves it.