
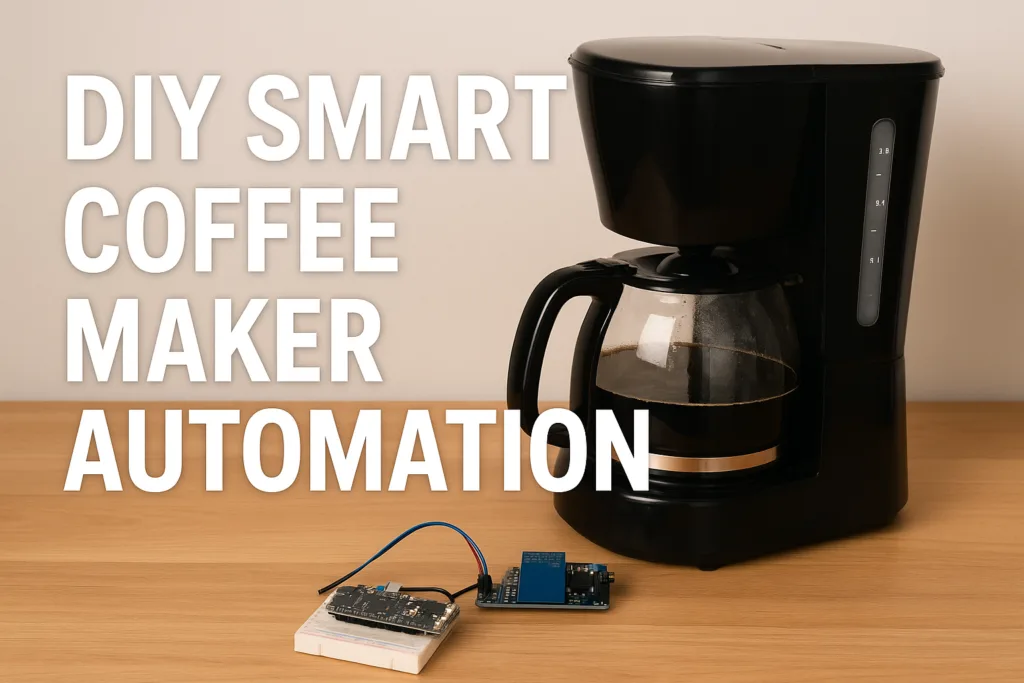
If you’re tired of fumbling for the “on” switch at 6:45 AM — while bleary-eyed and half awake — this is for you. Picture rolling out of bed, voice-commanding “Alexa, brew coffee” (or tapping your phone), and smelling fresh java within minutes. That’s the magic of DIY smart coffee maker automation — breathing new life into a regular coffee machine.
In this deep-dive guide, I’ll walk you through everything from simple smart-plug tricks to full-blown sensor-powered, IoT-enabled rigs. We’ll cover hardware, software, wiring, safety, routines — and even maintenance. So whether you’re a savvy renter, a smart home tinkerer, or just someone who likes coffee without the morning hassle — buckle up.
- Why DIY Smart Coffee Automation — is it worth it?
- What you’ll need: Hardware, software & safety gear
- Retrofit approaches — from simplest to advanced
- Step‑by‑Step Build: Wiring, Logic & Automation Workflow
- Why This Approach is Better Than Just Smart‑Plug / Timer
- Integrating with Smart Home Platforms & Ecosystems
- Maintenance, Safety & Long-Term Reliability
- DIY vs Smart Plug vs Buying a Smart Coffee Maker
- Example Use Cases & Automation Workflows
- FAQs
- Conclusion
Why DIY Smart Coffee Automation — is it worth it?
Let’s be real: manually starting a coffee maker in the morning is 2025’s version of walking uphill both ways. When you own a home-automation setup or love geeking out on IoT, retrofitting your coffee maker hits two birds with one bean.
- You use what you’ve already got. Instead of buying an expensive “smart-coffee machine,” you retrofit your trusty mug brewer. Money saved, nostalgia preserved.
- Total control & customization. Set brew-time based on your alarm; trigger brewing when you enter the kitchen; combine with lighting or thermostat routines.
- Satisfaction of building something real. Wiring relays, hooking up sensors, writing simple automation scripts — for DIYers, it’s a fun weekend project with caffeine payoff.
- Better long-term flexibility. Smart plugs can be limiting (just power on/off), but once you add sensors and microcontrollers, your coffee maker becomes part of a true smart home ecosystem.
But — yes — it’s not always smooth. Coffee makers draw lots of power, wiring mistakes can be risky, and you still need to load water/grounds. That’s why we go deeper than “smart plug + set a timer.”
What you’ll need: Hardware, software & safety gear
Before you grab your soldering iron — let’s list what you’ll need.
- A coffee maker with a mechanical on-off switch (push-button models may require extra wiring).
- Relay module / smart switch rated for the load (check power draw — many coffee makers use 800 W–1500 W or more).
- A microcontroller / IoT board — e.g., Arduino (Nano, MEGA), or ESP32 / similar. Many hobbyists use Arduino + relay to automate old coffee makers.
- (Optional but recommended) Sensors — e.g., water-level sensor, temperature sensor (for heating plate), maybe a flow meter if you upgrade further. Some DIY espresso-machine hacks replace the original controller entirely — sensors + flow meters included.
- For IoT builds: Wi-Fi or MQTT hub, or integration via a home-automation platform. Many modern hacks use Wi-Fi enabled boards to let you trigger brew remotely.
- Electrical safety gear — fuse or circuit breaker, proper grounding, insulated wiring, heat-resistant housing for mains wiring. Coffee makers draw significant current; improper wiring could be dangerous.
Retrofit approaches — from simplest to advanced
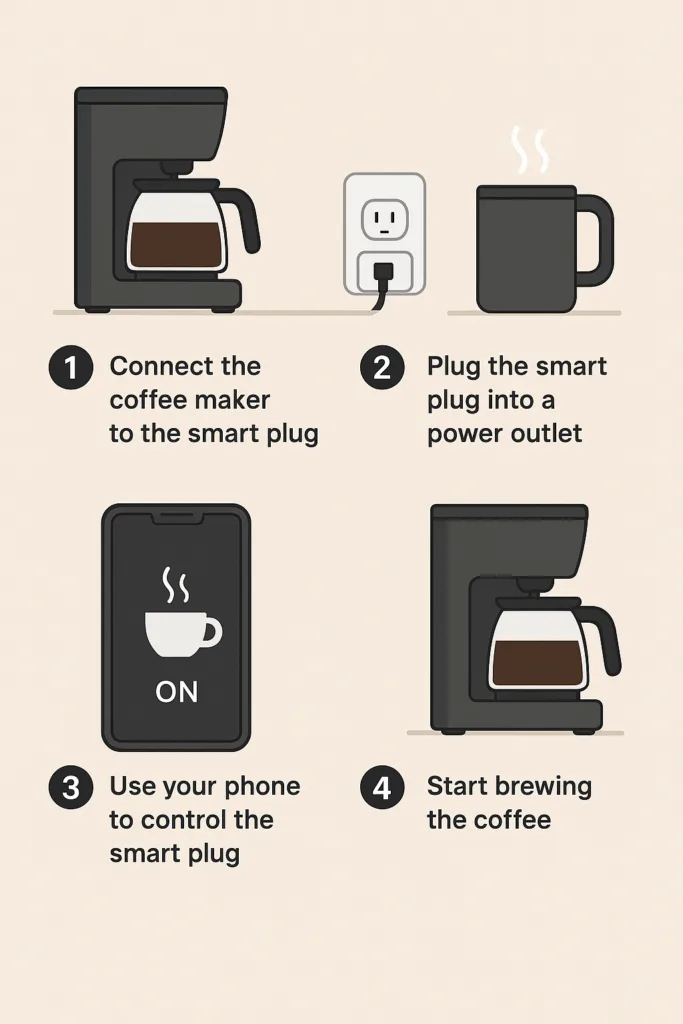
Smart plug/timer (baseline)
The easiest route: plug your coffee maker into a smart outlet. With a mechanical on-off switch, this often works — you can turn it on/off via app or voice.
Pros: cheap, easy, minimal wiring.
Cons: still manual loading of water/grounds, no feedback or safety automation, no schedule flexibility beyond the timer.
This basic method gets coffee ready — but it’s just the first rung on the ladder. If you’re looking for a quick and easy way to start automating your morning brew, check out our guide on turning a standard coffee maker smart for the basics before diving into a full DIY retrofit.
Relay & microcontroller / IoT board retrofit (DIY)
Time to get hands-on. Swap out or bypass the coffee maker’s switch and wire a relay controlled by a microcontroller (Arduino, ESP32, etc.). This gives you programmatic control over power. Many enthusiasts have already done this with success.
Pros: You now own the power flow — you can schedule brew, trigger via phone or smart home hub, and automate more than just “on/off.”
Cons: Requires basic electronics/wiring skills, careful handling of mains power, and you still handle water/grounds manually.
Sensor-based smart automation (water, temperature, occupancy)
This is where the magic happens. Add sensors — water-level sensors to detect the reservoir, temperature sensors on the heater, even flow meters or cup-detection sensors. Combine that with your microcontroller, and you turn a dumb machine into a near-smart appliance.
Some community projects go even further — for instance, one replaces the boiler controller on a single-boiler espresso machine, adding pressure transducers, flow meters, and full control logic.
Add home-automation integration (MQTT, voice assistants, routines), and your coffee maker becomes part of your smart home orchestration: lights, thermostat, coffee all in sync. Want a no‑fuss, plug‑and‑play smart coffee setup? The “Voice Control Your Morning” guide walks you through linking your machine to Alexa or Google for instant voice brewing.
Step‑by‑Step Build: Wiring, Logic & Automation Workflow
Before you think of brewing that first auto‑cup — read this. Because messing with mains power and heating elements is serious business. Safety first, fun second.
1. Disassembly & Safety Precautions — Treat AC like real fire
- Unplug the coffee maker, and let it cool down completely. Open its casing carefully, exposing the internal wiring and the manual power switch.
- Identify the “live (hot)” line feeding the heating element — this is what you’ll switch via a relay. Leave the neutral and ground wires untouched (don’t cut them, don’t reroute them, leave them on original paths).
- Use an insulated enclosure for all new wiring, secure all mains connections with proper terminal blocks, heat‑shrink tubing or insulated connectors. Add a fuse or circuit breaker rated appropriately for the coffee maker’s load (many draw 800 W–1500 W or more).
- If possible, use a solid‑state relay (SSR) or a high-quality mechanical relay with proper current rating. Generic cheap relays may wear out or weld contacts under heavy load, leading to a heater stuck‑on — a fire hazard.
Pro tip: Don’t treat this as a hobby until you’re comfortable with AC wiring, grounding, insulation, and safety devices. If in doubt — ask a licensed electrician.
2. Relay Wiring & Microcontroller Setup — Give your brew brain
Once you’re certain the wiring and safety setup is solid, the next step is to wire a relay in series with the live (hot) line, and connect the relay to a microcontroller (like an ESP32 / Arduino / similar).
A simplified wiring sketch:
AC Mains (Live) ──> Relay COM

Relay NO ──> Coffee Maker Live line (Heater)

Neutral & Ground ──> original Neutral & Ground (unchanged)
On the control side:
Microcontroller (5V or 3.3V) ──> Relay VCC & GND

Microcontroller GPIO PIN ──> Relay IN (signal)
When the microcontroller pulls the GPIO HIGH (or LOW, depending on the relay logic), the relay closes and supplies power to the coffee maker.
Important wiring tips:
- Make sure the relay module’s VCC & GND share the same ground reference as the microcontroller.
- Use solid‑core wires for mains connections; avoid stranded wires unless they’re properly terminated (with ferrules/spade connectors) to prevent overheating or looseness under load.
- Enclose the relay and mains wiring in a separate insulated box — keep low‑voltage (microcontroller, sensors) wiring away from 120 V / 230 V mains lines.
Before plugging in mains — always do a “dry‑test”: power the microcontroller only (no AC), trigger the relay via code, listen for the relay “click,” and inspect wiring for any shorts.
3. Optional: Add Sensors for Smarter Coffee — water, safety, and feedback
If you want more than “power on/off,” adding sensors gives real utility and safety.
Some useful sensors:
- Water‑level sensor or float switch — ensures the reservoir has water before brewing. Prevents dry‑boil hazard.
- Temperature sensor (e.g., DS18B20) mounted near the heater plate to detect when water is heated (or too hot), useful if you want to mimic traditional drip‑brew curves or implement auto shut‑off.
- Optional cup‑detection sensor or flow sensor — to ensure there’s a cup positioned or water is actually flowing. Good for safety/avoid spills.
With such sensors, you can script logic like:
if (water_level == LOW) { abort; alert_user(); }

else if (heater_temp >= MAX_TEMP) { trigger_relay_OFF(); notify("Brew done"); }
This moves your setup from “just automation hack” to “smart appliance.”
4. Microcontroller Code / Automation Logic — Example Pseudocode
Here’s a simple pseudocode sketch to get started (could be Arduino, ESPHome, etc.):
setup() {

  pinMode(RELAY_PIN, OUTPUT);

  pinMode(WATER_SENSOR_PIN, INPUT);

  pinMode(TEMP_SENSOR_PIN, INPUT);

  relay_off();

}

loop() {

  if (brew_command_received()) {

    if (water_sensor_is_full()) {

      relay_on();

      while (temp_sensor.read() < TARGET_TEMP && water_sensor_is_full()) {

        delay(500);

      }

      relay_off();

      notify_user("Coffee is ready!");

    } else {

      notify_user("Add water before brewing!");

    }

  }

  delay(200); // adjust as needed

}setup() {

  pinMode(RELAY_PIN, OUTPUT);

  pinMode(WATER_SENSOR_PIN, INPUT);

  pinMode(TEMP_SENSOR_PIN, INPUT);

  relay_off();

}

loop() {

  if (brew_command_received()) {

    if (water_sensor_is_full()) {

      relay_on();

      while (temp_sensor.read() < TARGET_TEMP && water_sensor_is_full()) {

        delay(500);

      }

      relay_off();

      notify_user("Coffee is ready!");

    } else {

      notify_user("Add water before brewing!");

    }

  }

  delay(200); // adjust as needed

}
You could expand this — add scheduling (e.g., brew at 7 AM), remote triggers via MQTT/HTTP, integration with home automation hub, power monitoring, and even logging. Projects like ESPHome‑based coffee maker mods do exactly this.
5. First Real‑World Test — Dry‑run, then Wet‑run
- Initially, do a dry‑run: don’t plug the mains heater, power the microcontroller — confirm relay toggles, LEDs blink, sensors (if any) read correctly.
- If the dry‑run succeeds — plug in, but don’t fill water. Test whether relay toggles heater power safely (heater “on” light should come on, no smoke, no sparks).
- If that passes — fill water (without coffee), start a “boil‑only” cycle — verify temperature readings (if you added a sensor) and ensure relay cuts off power at the correct time.
- Finally — load water + grounds, run full brew. Monitor the first few cycles carefully; check wiring temperature, enclosure heat, and relay contact heating.
Don’t go straight to “set it and forget it.” Treat the first 5–10 brews as QA / stabilization.
Why This Approach is Better Than Just Smart‑Plug / Timer
Some folks stop at “smart plug + schedule.” That works, but with big limitations:
- You get no feedback — if water’s empty, heater runs dry; if no cup, you waste power or worse leak.
- No safety features — heater may stay on if timer fails; no auto shut‑off after brew; no temperature control.
- No real integration — smart‑plug is dumb: only on/off, cannot trigger routines based on conditions (water level, safety, etc.).
Retrofit + sensor + logic = a proper “smart coffee appliance.” It’s safer, smarter, and more in tune with a mature smart‑home ecosystem (automation, multi‑device routines, fail‑safes).
Integrating with Smart Home Platforms & Ecosystems
Once your DIY coffee-maker is wired and sensor-ready, integration is where it gets fun. Use MQTT / open-source hubs (Home Assistant, OpenHAB, etc.) or link to voice assistants (Alexa, Google, HomeKit) — giving you mobile control, voice control, and scheduling flexibility.
Many builders use smart relays compatible with Z-Wave, Zigbee, or standard Wi-Fi to plug directly into home automation setups. For example: a relay inside the coffee maker enclosure, controlled by Home Assistant, lets you brew from anywhere — or set up multi-device routines (lights, thermostat, music, coffee all at once).
This truly blurs the line between “coffee maker” and “smart home appliance.”
Maintenance, Safety & Long-Term Reliability
Here’s where many DIY guides drop the ball — but you shouldn’t.
- Electrical safety & heating load: Coffee makers draw heavy current. Make sure your wiring, relay, fuse — everything — is rated properly. Insulate interior wiring, keep mains lines away from low-voltage logic. Over time, relays can wear out or weld closed, which could leave the heater powered — dangerous if no water or cup. Use solid-state or opto-isolated relays if possible.
- Water & grounds refill prompts: Use water-level sensors or float switches. Send a mobile alert if the reservoir is low. No point automating a brew if there’s no water — or worse, risk burning empty heating.
- Cleaning/descaling/maintenance reminders: Coffee machines need regular cleaning. Hook up a timer or counter to remind yourself — or even block brew if you’ve hit a certain number of cycles.
- Fallback & fail-safe logic: What happens if Wi-Fi drops, the microcontroller crashes, or the relay fails? Always leave a mechanical override or manual switch option. Avoid “always on if power present” wiring.
- Security & privacy (for cloud-enabled builds): If you expose your coffee maker to the internet, isolate it from other smart home systems, use firewalls or VLAN segmentation, avoid sharing credentials — treat it like any IoT device.
DIY vs Smart Plug vs Buying a Smart Coffee Maker
Here’s a quick mental guide — choose based on your needs:
- You want simplicity & plug-and-play: → Smart plug/timer. Quickest, easiest.
- You have wiring comfort and want reliability & customization: → DIY relay + microcontroller retrofit.
- You want full smart home integration, sensors, remote control, maintenance automation: → Advanced retrofit with sensors, IoT board & hub integration.
- You don’t want to mess with wiring at all and don’t care about tinkering: → Buy a ready-made smart coffee maker.
Each path has trade-offs. DIY gives flexibility and lower cost, but requires effort and technical caution. Smart plugs are easy but limited. Buying new is convenient — but often expensive and may lock you into proprietary ecosystems.
Example Use Cases & Automation Workflows
Morning maker for early risers — At 6:55 AM, your smart thermostat and lights kick on. Then at 7:00, brewing begins. Cup ready just as the alarm goes off.
Commuter return-brew — Walk in after work. A motion sensor in the hallway triggers the coffee maker; kitchen lights turn on — brew starts while you drop your bag, shoes off.
Energy-savvy household — Only brew after off-peak hours; auto-shut off after 10 minutes; log consumption to see how much energy your morning brew actually takes.
Remote brew for guests — Away from home, but want coffee ready when partner gets back? Use a phone app or smart home routine. Schedule it, trigger it, done.
Minimal-maintenance routine — Water-level alerts, descaling reminders, auto shut-off. Peace of mind when you’re away or on vacation.
FAQs
Can I use a smart plug and skip all wiring?
Yes — if your coffee maker has a mechanical on/off switch (not a push-button), a smart plug or timer works fine. You’ll still need to load water and coffee grounds manually.
Is it safe to wire relays and microcontrollers into a coffee maker?
It can be — if properly done. Use a relay rated for the load (coffee makers draw high current), proper insulation, grounding, and a fuse or circuit breaker. Overload or improper wiring can be dangerous.
Can I get notifications when brewing is done?
Absolutely — by adding sensors (water-level, heater temperature, current sensor) or integrating with IoT (MQTT, cloud), you can send notifications or trigger other routines. Many DIY IoT coffee-maker projects do exactly that.
What if the water reservoir is empty — will the brew still start?
Not good. That’s why a water-level sensor or float switch is recommended. Without it, heating an empty pot could damage the machine or cause hazards.
Is this retrofit reversible?
Depends on how you wire it. If you avoid destructive modifications — e.g., soldering on buttons — and instead use relays or external modules, you can restore the machine later. Solid-state or relay-based wiring is easier to undo.
Do I need programming skills?
Basic scripting or wiring knowledge helps, but many Arduino/ESP32 projects online have ready-made code. You’ll need to configure sensor thresholds and triggers, but nothing too exotic for a hobbyist.
Can I integrate my DIY coffee maker with voice assistants or home-automation systems?
Yes. If your controller is Wi-Fi enabled or connected to an MQTT hub or smart home platform, you can tie it to voice assistants, schedule routines, and coordinate with lights, thermostat, or other devices.
What about maintenance and long-term reliability?
You’ll need to maintain wiring, monitor relay wear, clean and descale regularly, ensure sensors stay calibrated, and keep firmware (if any) updated. Treat it like any other appliance in your home — not just a weekend hack.
Conclusion
If you’re a smart home enthusiast, engineer, renter, or just a coffee lover with a hankering for convenience, DIY smart coffee maker automation is one of those rare projects that hits both practical and fun. Get your parts, double-check your wiring, maybe brew some test cycles without water first — then enjoy that first sip of truly automated coffee.
Retro-fitting your coffee maker into a smart home appliance — if done right — is one of those “small project, big payoff” deals. You get convenience, control, customization — and that little jolt of satisfaction when your own build works smoothly.
Plan carefully. Respect the danger of mains electricity. Use proper wiring, relays, sensors, and fail-safes. Treat your machine like any other IoT device — secure, monitored, and maintained. Then you not only save money, but you build something that feels like it belongs in the smart home of the future.
But — more than anything — you reclaim your morning. Because coffee should start when you want it, not when you remember.
Ready to get started? Grab a relay module and an Arduino (or ESP32), bookmark this guide — and start building. Your mornings — and your future self — will thank you.