

If you’ve ever stood in a hardware aisle squinting at bulbs and switches, wondering, “Where do I even start?”, you’re not alone. This smart home lighting installation guide cuts through the jargon and gives you clear, actionable steps to upgrade your home lighting—whether you’re a renter swapping a lamp bulb or a DIYer replacing dozens of switches. Expect decisive advice on smart bulbs vs smart switches, real wiring tips for multi-switch (3-way) setups, hub vs hubless pros and cons, and security + energy considerations specific to US homes.
You’ll get practical checklists, wiring realities (yes, neutral wires matter), and automation ideas that actually solve problems—like “how to keep lights usable for guests” and “how to simulate presence when travelling.” Plus, I point you to official setup pages and installer-level guidance when it makes a difference. Read on and you’ll leave with a plan, the right shopping list, and confidence to tackle the job safely.
- 1. Decide your approach: bulbs, switches, or hybrid?
- 2. Plan first — map rooms, fixtures, and use cases
- 3. Wiring realities: neutral wires, 3-way switches, and safety
- 4. Hub vs hubless: which one for your smart lighting?
- 5. Step-by-Step Smart Home Lighting Installation Guide
- 6. Automation ideas that actually save time and energy
- 7. Security & performance: don't ignore this
- 8. Cost, ROI, and product pick-list
- FAQs
- Conclusion
1. Decide your approach: bulbs, switches, or hybrid?
There are three practical paths:
Smart bulbs — Screw-in bulbs (Wi-Fi or Zigbee) are fastest and renter-friendly. Great for accent lighting and single fixtures, but they break the smart behaviour if somebody flips the wall switch off. Use them where the switch will stay on or pair with an in-line smart control.
Smart switches & dimmers — Replace the wall control and you gain reliable control of the entire circuit (so guests can still use the switch normally). They often require a neutral wire and some basic wiring skills or an electrician for confidence. Home Depot’s how-to covers the essentials.
Smart modules & inline relays — Hidden modules fit in junction boxes or fixture cans and convert existing fixtures into smart devices without changing the switch location—handy for tricky retrofits. Vesternet dives deep into this option.
Pick the path that matches your goals: low friction (bulbs), circuit-level control (switches), or invisible retrofit (modules). Often, the best solution is a hybrid—bulbs where you need colour, switches where you need reliability.
2. Plan first — map rooms, fixtures, and use cases
Start with a simple floor map. For each room, write one sentence describing how you want the lights to behave. Examples:
- “Kitchen: bright, instant on for 100% task light; dimmable for evening.”
- “Hallway: motion-activated at night, off during the day.”
- “Living room: scenes for TV, reading, and dinner.”
Ask the practical questions early: Will guests frequently toggle switches? Do you need colour-changing bulbs? Is the switch box big enough to accept a smart switch and the extra wires? These decisions reduce re-work later and guide whether you need a hub or can go hubless.
3. Wiring realities: neutral wires, 3-way switches, and safety
This is the part many guides skim. Please don’t skip it.
Neutral wire requirement. Many smart switches require a neutral (white) wire in the box to power the switch electronics. Older US homes (pre-1980s) sometimes lack a neutral at the switch, so check first. If there’s no neutral, you can either use a no-neutral smart switch model, install a smart module at the fixture, or hire an electrician to run/repurpose wiring.
3-way (multi-location) wiring. Replacing a 3-way setup requires a 3-way smart switch or a companion (enslaved person) switch—follow the manufacturer’s wiring diagram carefully. Mistwiring is common; if the colours in your box don’t match standard patterns, test with a voltage tester and consult the switch manual. Home Depot’s 3-way user guide and many product manuals provide step-by-step diagrams.
Safety checklist before touching wires: turn off the breaker, verify with a non-contact voltage tester, photograph existing connections, and keep wire nuts snug. If any wiring looks non-standard, call a licensed electrician—electrical code and local permits matter. Don’t guess.
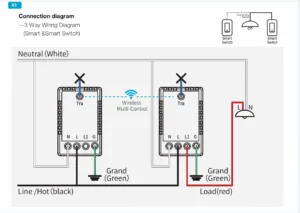
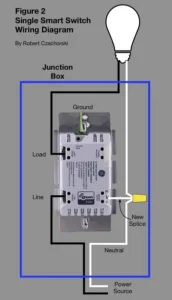
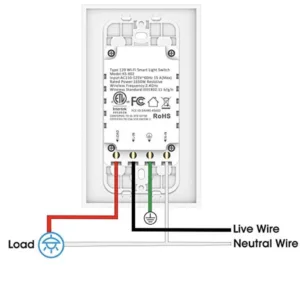
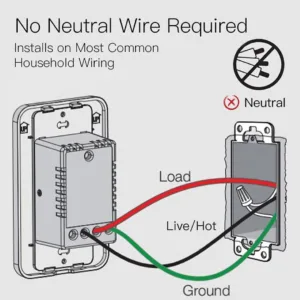
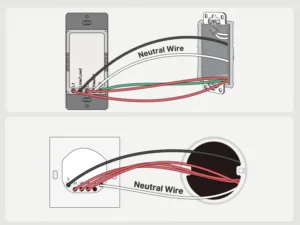
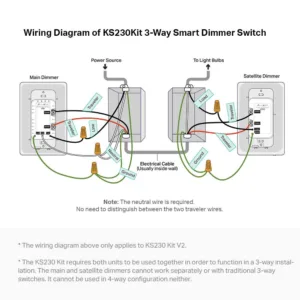
Image Courtesy: www.kasasmart.com
4. Hub vs hubless: which one for your smart lighting?
Hubless (Wi-Fi) bulbs and switches: Easier to start, fewer devices to buy, but Wi-Fi congestion and reliability can become an issue if you have many devices.
Hub-based (Zigbee/Z-Wave, Matter hubs): Better mesh reliability, lower latency, more scalable and often required for large installations. Matter compatibility is the newest advantage—buying Matter-certified devices reduces vendor lock-in and improves cross-platform control. Philips Hue, for example, still leads in app polish and hub features for colour lighting.
Pro tip: For whole-house projects, invest in a small Ethernet-connected hub (or a mesh router with a strong backhaul) to keep things snappy. If you want the latest features like RF sensing motion in mains-powered bulbs, watch product updates (Hue’s MotionAware is an example of advancing tech).
5. Step-by-Step Smart Home Lighting Installation Guide
Below is an action sequence that covers bulbs and switches. Take your time.
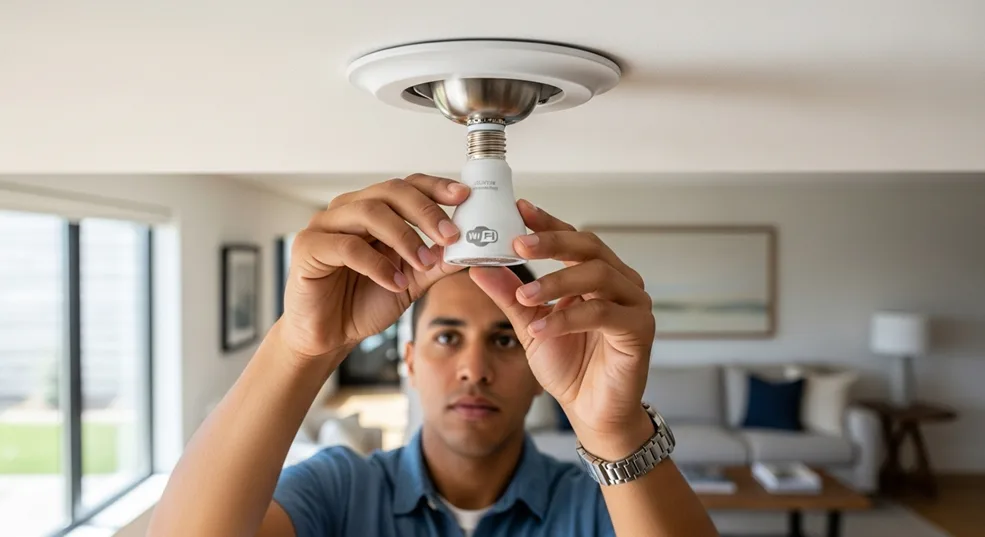
A. Smart bulbs (quick wins)
- Ensure the wall switch for the fixture stays ON.
- Replace the bulb with the smart bulb and power on.
- Install the manufacturer app (or hub app), create an account, and add the device.
- Assign room names, test voice integration with Alexa/Google/Siri. Philips Hue has a full setup walkthrough for bulbs and bridges.
B. Smart switch/dimmer (moderate DIY)
- Turn OFF the power at the breaker and verify with a voltage tester.
- Remove the faceplate and label wires or take a photo.
- Follow the switch manual—connect line (hot), load, neutral (if required), ground, and traveller wires for 3-way setups.
- Mount the switch, restore power, and complete app pairing. Home Depot’s guide outlines a robust install process.
C. Hub setup & grouping (if applicable)
- Plug the hub into the router; power up.
- Use the hub app to add devices, group lights by room, and create scenes.
- Integrate voice assistants via the hub or app for consistent voice control.
6. Automation ideas that actually save time and energy
Stop automating for the sake of gadgets—automate for outcomes.
- Motion-based nights: Dim hallway lights to 20% between 11 pm–6 am.
- Sunset/dusk triggers: Outdoor and porch lights ON at dusk, OFF at sunrise.
- Presence mimicry: Randomize on/off patterns while away to deter burglars.
- Wake/sleep lighting: Gradual sunrise simulation and bedtime fade.
- Energy mode: Automatically dim or turn off lights in unoccupied rooms.
Automation is a habit—start with one scene and refine. Use clear names for scenes so everyone in your house understands them.
7. Security & performance: don’t ignore this
Smart lighting is part of your network. Treat it like it.
- Keep firmware updated. Manufacturers patch bugs and close security holes.
- Put smart devices on a guest/IoT VLAN or separate Wi-Fi SSID when your router supports it.
- Use strong, unique passwords and enable multi-factor authentication on hub/cloud accounts.
- Limit integrations to trusted services and restrict unnecessary remote access if you don’t need it.
A secure setup reduces the risk of malicious actors controlling your lights—or using them as a foothold into your network.
8. Cost, ROI, and product pick-list
Smart bulbs: ~$8–40 per bulb (colour is pricier).
Smart switches/dimmers: ~$30–$100 per switch, depending on features. PCWorld’s recent list highlights top smart dimmers and switches you can consider for whole-house installs. Large savings come from behaviour change—automating off/dimming reduces wasted lighting energy.
If you’re unsure where to start, buy a hub-compatible starter kit (bridge + 2 bulbs) for a living room pilot, then migrate other areas based on what worked.
FAQs
Should I choose smart bulbs or smart switches?
Smart bulbs are ideal for renters and single fixtures needing colour; smart switches control entire circuits and keep manual switches functional. Choose switches for high-use areas (kitchen, living room) and bulbs for lamps or accent lights. Hybrid deployments often work best.
Do smart switches need a neutral wire?
Many smart switches require a neutral wire to power the switch electronics. If your box lacks a neutral, options include no-neutral switch models, installing a module at the fixture, or hiring an electrician to update wiring. Check product specs before buying.
Can guests use my smart lights easily?
Yes—by keeping the physical wall switch behaviour natural (use smart switches or smart modules) and creating simple voice commands or physical remotes. Educate guests with a short note: “Use this switch like a normal switch.” Simplicity wins.
Is a hub necessary for smart lighting?
Not always. Wi-Fi bulbs and switches can work without a hub, but hubs (Zigbee/Z-Wave/Matter) typically offer better reliability, lower latency, and scale more easily for whole-house installations. Consider a hub for 10+ devices.
How do I secure my smart lighting system?
Keep firmware current, use strong hub account passwords, enable two-factor authentication, and isolate devices on a guest or IoT network segment. Limit unnecessary cloud integrations and review connected services periodically.
Can smart lighting save money?
Yes—automation (timers, motion sensors, dimming) reduces wasted hours of lighting and lowers electricity usage. Savings vary by usage patterns, but practical habits plus LED efficiency give measurable returns over time.
What is Matter, and why should I care?
Matter is an interoperability standard that makes devices from different brands work together. Buying Matter-certified gear reduces vendor lock-in and improves cross-platform reliability—good for future-proofing your system.
Conclusion
Smart lighting transforms how your home feels and behaves—no question. But it’s not about buying the brightest bulb or the fanciest hub; it’s about planning, choosing the right control method (bulb, switch, or module), and making safe, secure wiring choices. This smart home lighting installation guide gives you both the strategy and the practical steps: map your rooms, check for neutral wires, decide hub vs hubless, and start with a small pilot. Then scale deliberately.
If you want one simple place to begin: pick a living-room starter kit (hub with two bulbs or a smart dimmer), create two scenes—“Evening” and “Movie”—and add motion-triggered hallway lighting. That pilot will teach you the feel and surface real problems like guest usability, Wi-Fi strain, or switch incompatibilities.
Ready to upgrade? Buy a starter kit or smart dimmer from a trusted brand, or book a licensed electrician for any wiring work. If you’d like, I can recommend specific Matter-compatible starter kits or a shopping list tailored to your home size and wiring situation. Click the link below to get a curated product list that matches your needs and budget—let’s make your home smarter, safer, and more comfortable today.
Want a personalized shopping list (bulbs vs switches, hub suggestions, and estimated cost)? Please tell me your home size and whether your switch boxes have neutrals—and I’ll build it for you.